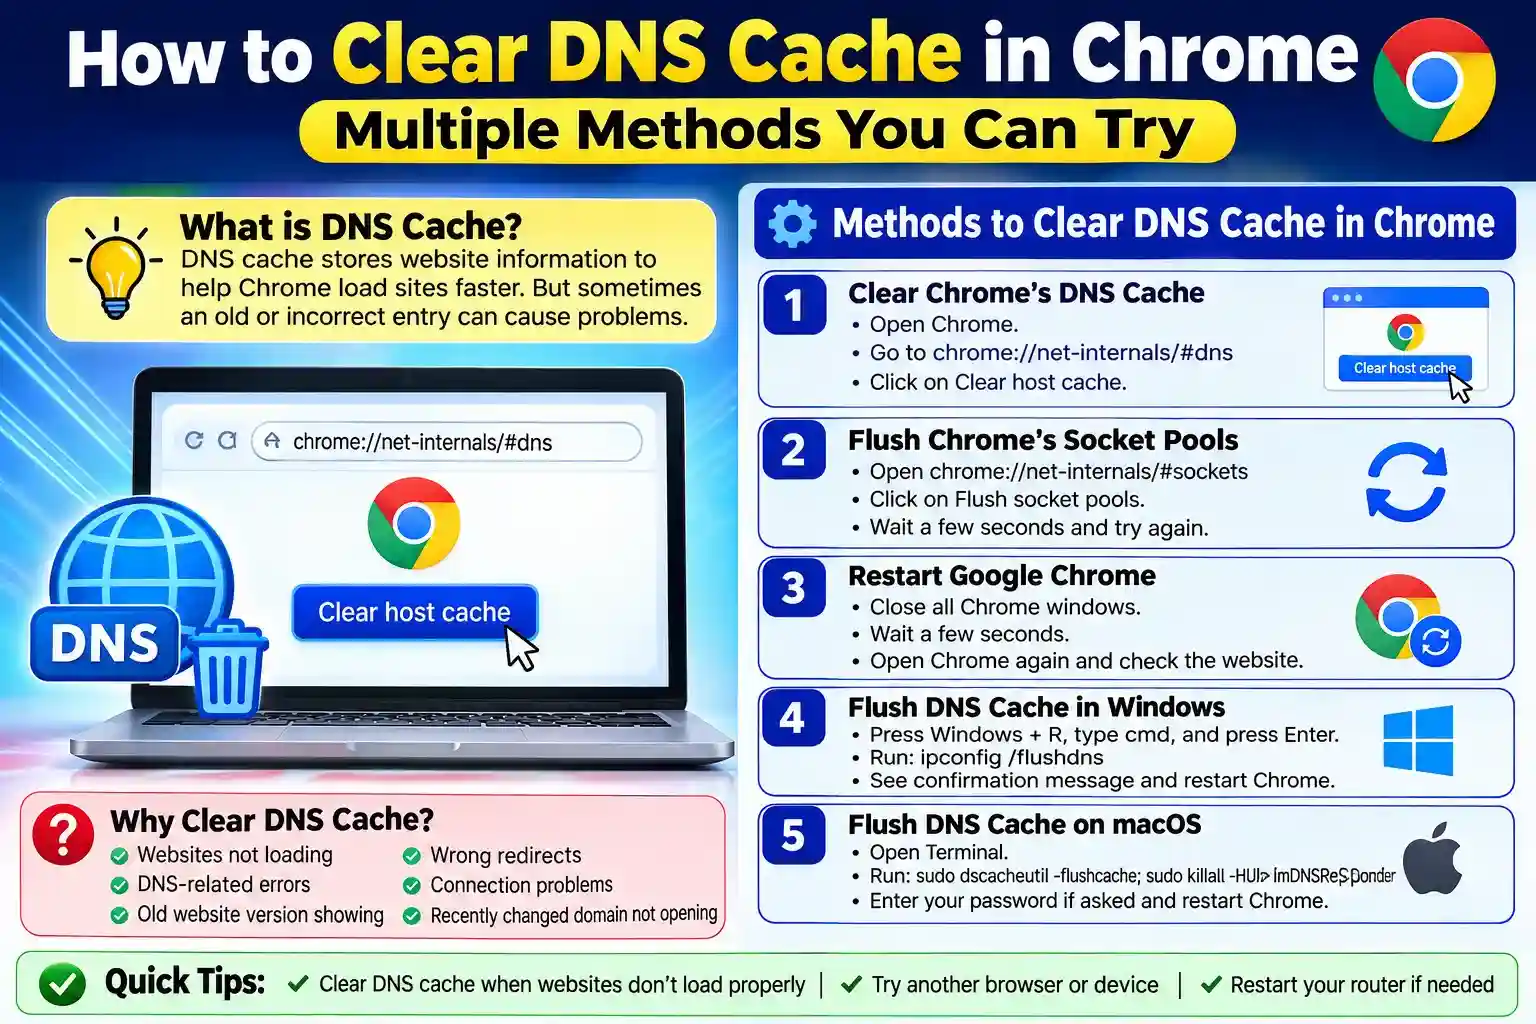
Have you ever tried opening a website in Google Chrome, only to find that it won’t load properly, shows an old version, or keeps redirecting you to the wrong page? Sometimes, the problem isn’t the website or your internet connection—it may be your DNS cache.
Chrome stores DNS information to speed up website loading. While this usually works in the background without any issues, an outdated or incorrect DNS entry can occasionally cause connection problems.
The good news is that you can clear the DNS cache in Chrome using several simple methods.
In this guide, we’ll explain what Chrome DNS cache is, why you may need to clear it, and different methods you can try on Windows, Mac, Android, and other devices.
What Is the DNS Cache in Chrome?
The Domain Name System is known as DNS. By translating website names like example.com into IP addresses that your device can connect to, it functions similarly to the internet’s phone book.
Chrome temporarily saves certain DNS information in its own cache to speed up browsing. As a result, Chrome might not have to do a fresh DNS query each time you visit a website.
However, you can encounter issues like the following if the DNS data is out-of-date or inaccurate:
- Websites fail to load
- DNS-related mistakes
- “This website is unreachable” messages
- Websites that open with the wrong IP address
- Issues with connections or redirects
- Newly moved webpages aren’t opening properly
- Issues following DNS configuration changes
Chrome must make new DNS lookups when the DNS cache is cleared.
Why Should You Clear the Chrome DNS Cache?
Generally speaking, you don’t need to frequently empty your DNS cache. When debugging particular browsing or connectivity issues, it can be helpful, nevertheless.
You might want to empty the cache, for instance, if
- Recently, a website switched servers or hosting companies.
- The DNS records for your domain have been updated.
- Chrome is displaying an out-of-date webpage.
- You switched DNS providers.
- A webpage functions in other browsers but not in Chrome.
- Unexplained DNS problems are occurring for you.
Prior to emptying the cache, keep in mind that DNS issues may also arise from the DNS setup of the website, your operating system, router, or ISP.
Method 1: Clear Chrome’s DNS Cache
One of the easiest methods is to use Chrome’s internal networking page.
Step 1: Open Chrome
Launch Google Chrome on your computer.
Step 2: Open the DNS Page
Enter the following address into Chrome’s address bar:
chrome://net-internals/#dns
Press Enter.
Step 3: Clear the Host Cache
You should see Chrome’s DNS information and a button labeled Clear host cache.
Click Clear host cache.
Chrome will clear its host-resolution cache.
Step 4: Reload the Website
Now open the website you’re having trouble with and refresh the page.
It’s often a good idea to completely close and reopen Chrome after clearing the cache.
Method 2: Flush Chrome’s Socket Pools
Sometimes clearing the DNS cache alone isn’t enough.
Chrome also maintains socket connections that may continue using previously resolved network information. You can therefore try flushing Chrome’s socket pools.
Follow These Steps:
Open:
chrome://net-internals/#sockets
Then look for the option to:
Flush socket pools
Click it and wait a few seconds.
After that, return to the website and try loading it again.
Why Does This Help?
Clearing the DNS cache removes cached DNS information, while flushing socket pools can help Chrome establish fresh network connections.
If you’re troubleshooting a stubborn connection issue, clearing the DNS cache and flushing socket pools together can be more effective than doing either one alone.
Method 3: Restart Google Chrome
It sounds simple, but restarting Chrome can sometimes solve temporary networking problems.
After clearing the Chrome DNS cache:
- Close all Chrome windows.
- Wait a few seconds.
- Open Chrome again.
- Visit the website.
- Check whether the problem has been resolved.
If Chrome was holding onto an old connection or temporary networking state, restarting the browser may help.
Method 4: Flush the DNS Cache in Windows
If clearing Chrome’s DNS cache doesn’t solve the problem, the issue may be with your Windows DNS cache.
You can flush it separately.
Step 1: Open Command Prompt
Press:
Windows + R
Type:
cmd
Then press Enter.
Step 2: Run the DNS Flush Command
Enter:
ipconfig /flushdns
Press Enter.
Windows should display a message confirming that the DNS Resolver Cache was successfully flushed.
Step 3: Restart Chrome
Close and reopen Chrome, then try accessing the website again.
Why Use This Method?
Chrome has its own DNS-related cache, but your operating system can also cache DNS records. Flushing Windows DNS can therefore help when the browser cache isn’t the actual source of the problem.
Method 5: Flush DNS Cache on macOS
Mac users can also clear their system DNS cache.
The exact command can vary depending on the macOS version, so it’s best to use the appropriate command for your installed version.
A commonly used command on modern macOS versions is:
sudo dscacheutil -flushcache; sudo killall -HUP mDNSResponder
Steps:
- Open Terminal.
- Enter the DNS flush command.
- Enter your Mac password if requested.
- Restart Chrome.
- Try opening the website again.
If you’re unsure which command applies to your macOS version, check Apple’s current documentation before running system-level commands.
Method 6: Clear Chrome’s Cached Data
If DNS troubleshooting hasn’t helped, another possibility is that Chrome’s regular cached data is causing the issue.
To Clear Chrome Cache:
- Open Chrome.
- Click the three-dot menu.
- Select Settings.
- Go to Privacy and security.
- Select Delete browsing data.
- Choose a suitable time range.
- Select Cached images and files.
- Click Delete data.
You don’t necessarily need to delete your browsing history or saved passwords.
Important Tip
Clearing normal browser cache and clearing DNS cache are two different things. If you’re troubleshooting a DNS problem, you may want to try the DNS-specific methods first.
Method 7: Restart Your Router
Sometimes the problem isn’t Chrome at all.
Your router or network may have cached DNS information, especially if you’ve recently changed DNS records or DNS servers.
Try this:
- Close Chrome.
- Turn off your router.
- Wait around 30 seconds.
- Turn the router back on.
- Wait for your internet connection to return.
- Open Chrome.
- Try visiting the website again.
This can refresh your local network connection and may resolve temporary DNS issues.
How to Clear the DNS Cache in Chrome on Android?
Chrome on Android doesn’t provide the same desktop networking controls in a consistently usable way.
If you’re having DNS or website-loading problems on Android, try these alternatives.
Option 1: Restart Chrome
Close Chrome completely and open it again.
Option 2: Clear Chrome’s App Cache
Go to:
Settings → Apps → Chrome → Storage → Clear Cache
The exact menu names may vary depending on your Android phone.
This clears temporary Chrome files but is not exactly the same as clearing Chrome’s desktop DNS host cache.
Option 3: Restart Your Phone
A simple restart can refresh temporary network and DNS-related information.
Option 4: Check Your DNS Settings
If the problem continues, check your Android device’s network or private DNS settings.
How to Clear the DNS Cache in Chrome on iPhone?
Chrome on iPhone operates within Apple’s browser framework, so desktop Chrome’s internal DNS tools aren’t available in the same way.
If you’re experiencing website or DNS problems, try:
- Close and reopen Chrome.
- Restart your iPhone.
- Switch between Wi-Fi and mobile data.
- Restart your Wi-Fi router.
- Check your network’s DNS configuration.
- Update Chrome and iOS if updates are available.
If the problem affects multiple apps and websites, the issue is more likely related to your device or network rather than Chrome itself.
How to Know If Your DNS Cache Was Cleared?
After clearing the DNS cache, there isn’t always a visible confirmation that everything has been fixed.
The easiest way to test it is to revisit the website.
You can also try:
- Opening the website in incognito mode.
- Trying another browser.
- Switching from Wi-Fi to mobile data.
- Restarting Chrome.
- Running a DNS lookup from another device.
If the website works normally elsewhere but not in Chrome, the browser may still have cached data or another local configuration issue.
Also Read:- How to Turn Off an Android Phone Quickly: Easy Methods?
What If Clearing the DNS Cache Doesn’t Work?
Don’t worry if clearing Chrome’s DNS cache doesn’t fix the problem. DNS issues can occur at several levels.
The problem could be related to:
- Chrome’s DNS cache
- Operating system DNS cache
- Router DNS cache
- DNS server
- ISP
- Domain’s DNS configuration
- Website’s hosting server
- Firewall or security software
Try troubleshooting each layer instead of repeatedly clearing Chrome’s cache.
For example, if a website doesn’t work on your computer but works perfectly on your phone using mobile data, the problem may be related to your local network or DNS configuration.
Chrome DNS Cache vs System DNS Cache
It’s important to understand the difference.
| Cache | Where It Exists | What You Can Try |
| Chrome DNS cache | Google Chrome | Clear Chrome host cache |
| OS DNS cache | Windows/macOS | Flush system DNS |
| Router DNS cache | Network router | Restart the router. |
| ISP DNS cache | Internet provider | Wait or use another DNS resolver |
| Website DNS | Domain/server side | Check DNS records and propagation |
This is why clearing Chrome’s DNS cache isn’t always a complete solution.
When Should You Clear the DNS Cache?
You don’t need to clear the DNS cache every day or every week.
Consider doing it when:
- A website’s DNS records were recently changed.
- You migrated your website to a new hosting company.
- Your domain recently changed servers.
- Chrome is opening an old version of a website.
- You’re troubleshooting DNS errors.
- A website works on another device but not yours.
- You recently changed DNS servers.
For normal browsing, Chrome’s DNS caching is useful and should generally be left alone.
Final Thoughts
Clearing the DNS cache in Chrome is a quick troubleshooting step that can solve certain website-loading and DNS-related problems. The easiest place to start is Chrome’s chrome://net-internals/#dns page and the Clear host cache option.
If that doesn’t work, try flushing Chrome’s socket pools, clearing your operating system’s DNS cache, restarting your router, or checking your website’s DNS configuration.
Most importantly, don’t assume every connection problem is caused by Chrome. DNS issues can happen at multiple levels, so testing the website on another browser, device, or network can help you quickly identify where the real problem is.
Quick Troubleshooting Checklist
- Clear Chrome’s DNS host cache.
- Flush Chrome’s socket pools.
- Restart Chrome.
- Flush your operating system’s DNS cache.
- Clear Chrome’s temporary cache.
- Restart your router.
- Test the website on another browser.
- Test using another network.
- Check your domain’s DNS configuration.
With these methods, you should be able to identify and resolve many common DNS-related issues while browsing with Chrome.
Frequently Asked Questions
Open Chrome and go to chrome://net-internals/#dns. Then select Clear host cache. You can also flush Chrome’s socket pools if you’re still experiencing connection problems.
No. Clearing Chrome’s DNS host cache does not delete your browsing history, bookmarks, or saved passwords.
There is no need to clear it regularly. Do it when you’re experiencing DNS, website-loading, redirect, or connectivity problems.
The old content may be coming from your browser cache, operating system, router, CDN, or the website’s server. Try clearing the regular Chrome cache and flushing your system DNS as well.
Chrome’s desktop DNS management page isn’t available in the same way on Android. Instead, restart Chrome, clear its app cache, restart your device, or check your network and private DNS settings.
Usually, clearing DNS cache does not make your internet connection faster. DNS caching is designed to make connections more efficient. Clearing it is mainly useful for troubleshooting.
The Chrome networking DNS page is:
chrome://net-internals/#dns
From there, you can use the Clear host cache option.
It can be helpful when testing DNS changes locally. However, DNS propagation can also involve DNS caches outside your computer, so clearing Chrome’s cache does not instantly update DNS information everywhere.